3. Settings

Settings are where you can define language preferences and SMS information for each mission.

image0

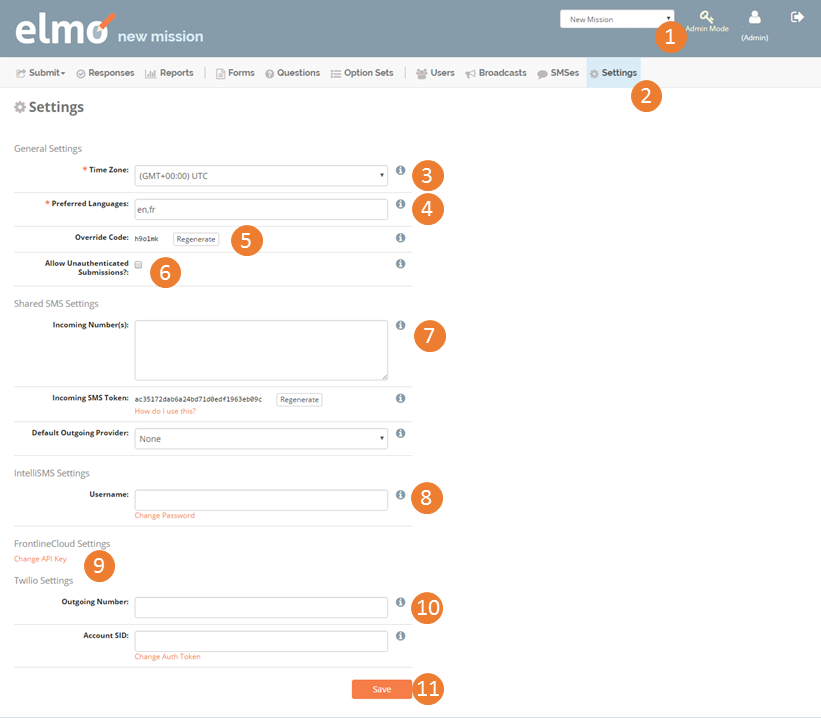
  1. Select the title of the mission in the drop down menu found in the top right corner, right of the Admin Mode selection
  2. Select the Settings menu

3.1. Time Zone

  1. Set the appropriate time zone

3.2. Preferred Languages

  1. Set the language(s) for the mission. This allows questions and forms to be defined in multiple languages for each mission, but it does not change the entire web interface of ELMO (defined in “Viewing the Footer” section above).

    1. Enter the two-letter language code for the language (example: Arabic = ar; Chinese = zh). A list of ELMO compatible language codes can be found at this website: http://www.loc.gov/standards/iso639-2/php/code_list.php

    2. If multiple codes exist, type them in the preferred order of use and separate them with a comma (example: ar, zh)

      multiple preferred langs

    3. In this example, the mission’s primary language will be Arabic; Chinese will be used where Arabic is not available

3.3. Override Code

  1. Generate an Override Code
    1. Click on the Generate button to set an override code. This code should be given to observers if the ability to send incomplete responses is needed. Users are not allowed to submit incomplete responses without this code when using the ODK app. (See section  for more detail)
    2. Click on the Regenerate button to create a new override code if desired.
    3. If generating a new code, please record the old code if there are previous live forms. The new code will only work for forms downloaded after the code is regenerated.
  2. Choose whether to allow unauthenticated submissions.

3.4. Shared SMS settings

Indepth information about SMS setup is available in the section for Administrators.

  1. Shared SMS settings:
    1. Incoming Number(s):
      1. Enter the phone number(s) to which incoming SMSes for SMS forms should be sent. This field will be displayed, verbatim, on the SMS guide. Only needed if using SMS submissions
    2. Incoming SMS Token:
      1. This token is included in the URL used by the incoming SMS provider to prevent the submission of unauthorized messages.
      2. Click on “How do I use this?” for further instructions.
      3. Register the incoming SMS URL with your gateway provider
      4. Copy the URL from the pop up screen
    3. Default Outgoing Provider:
      1. The adapter used to send outgoing SMSes. Note that SMS replies may be sent out via a different adapter, depending on the adapter by which they arrived.
      2. Our current provider choices are IntelliSMS and Twilio (refer to section  for how to set this up)
  2. IntelliSMS Settings:
    1. Enter the username for the IntelliSMS account
  3. FrontlineCloud Settings:
    1. Click Change API Key and enter the API Key for the FrontlineCloud activity
  4. Twilio Settings:
    1. Enter the outgoing number
      1. This is the phone number registered with Twilio. Outgoing SMS broadcasts won’t work unless this number is owned by your Twilio account. This number must include the country code. Example: +25680344523
    2. Enter the account SID:
      1. This is the account SID for the Twilio account
      2. If needed, click Change Auth Token to change the auth token for the Twilio account.
  5. Click Save to keep any settings.