12. fonctionnalités et informations supplémentaires
12.1. messages de diffusion
Coordinators may want to broadcast messages to observer teams in the field in the instance of a change of polling location, schedule, or another event. Administrators and coordinators can send Broadcasts via email or SMS to individual users or all active users on a mission.
Please note that you need an ELMO SMS gateway with SMS credit established before messages can be sent.
To send a Broadcast Message:
Click the Users menu
Select the user(s) to receive a message by marking the boxes next to their name(s)
NOTE: Observers do NOT have the ability to reply to broadcast messages – instruct observers to contact the observer coordinator directly if they need to discuss a broadcast message or other issue.
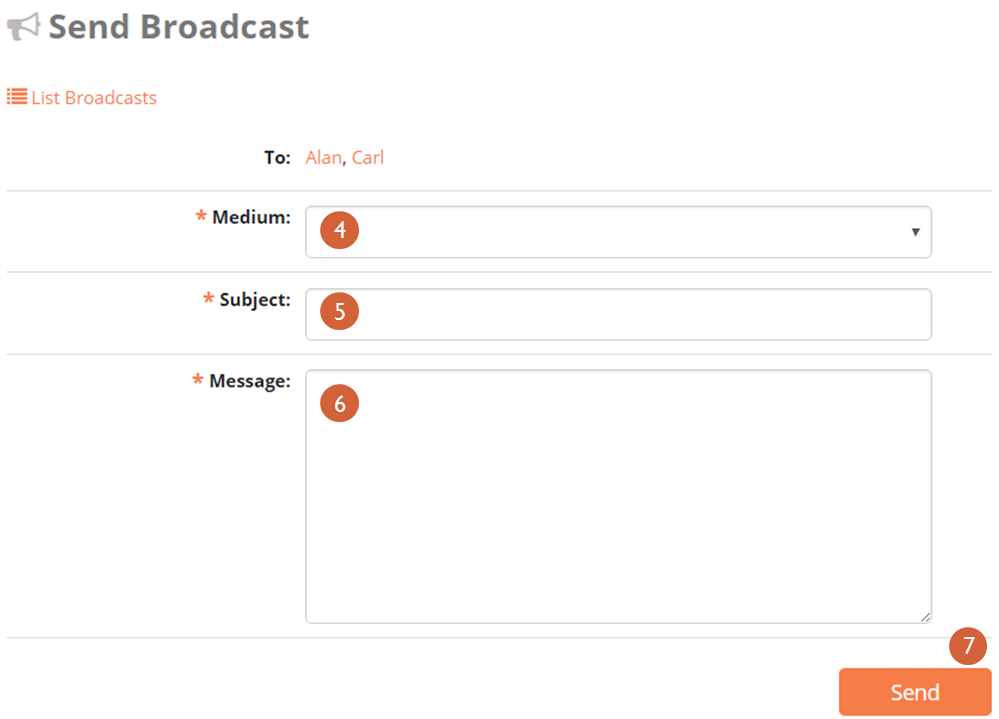
Click Send Broadcast—this action will direct to a page where the medium of the broadcast can be selected, and the subject and its content can be entered into a text field

Select a medium from the drop down list:
- SMS preferred: will try to send a SMS and then an email, if unsuccessful
- Email preferred: will try to send an email and then an SMS if unsuccessful
- SMS only: will send only SMS
- Email only: will send only email
- Both SMS and Email: will send both SMS and email
Type a subject in the Subject line
Type your broadcast message in the Message box
- Click Send
12.2. Converting and Displaying GPS Coordinates in ARcGIS 10
There are many ways of representing locations. One of the most common uses angular latitude and longitude coordinates to specify the location of a point. These Geographic coordinates may be expressed in several different notations, including Decimal Degrees (DD), Degrees Decimal Minutes (DDM), and Degrees Minutes and Seconds (DMS). The formula for converting Degree Minutes and Seconds to Decimal Degrees is discussed in the ArcGIS 10 Help. Another common method is to use a projected coordinate system and X and Y coordinate pairs, that is, two sets of numbers in a planar Cartesian system.
Gridded systems, like Universal Transverse Mercator (UTM), United States National Grid (USNG), Military Grid Reference System (MGRS) divide the world into zones which are projected and then overlaid with one or more grids. Within the grids, point locations are specified by their position East and North the zone origin or the southeast corner of the cell. For USNG and MGRS the numeric values of the northing and easting can vary from 1 to 5 digits, depending on the precision of the location (they must both use the same number of digits) and then the values are concatenated.
Two less frequently used systems, the Global Area Reference System (GARS) and Geographic Reference System (GEOREF), divide the world into polygonal areas based on different sets of nested grids and encode locations as a string of grid ID values.
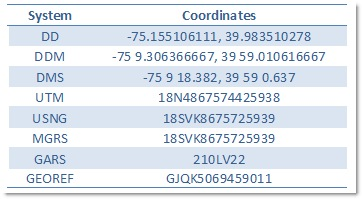
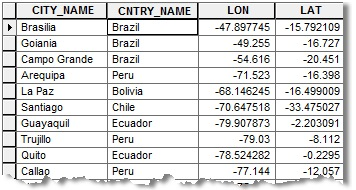
Each of these ways of representing a location results in different strings of characters with a variety of formats. This table shows the coordinate representation for Philadelphia, Pennsylvania in the US (75° 9’ 18.382” West longitude by 39° 59’ 0.637” North latitude) in each of these systems. This is not an exhaustive list of the delimiters and hemisphere indicators that are used in each system.
ArcGIS 10 can convert coordinates expressed in each of these systems into the others, and provides ways of displaying and accepting coordinate input in most of them.
Displaying Coordinates
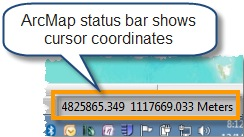
You can see the coordinate value for a place on a map in the ArcMap status bar, at the bottom right of the application. The default coordinate format in the status bar is based on the units of the first layer added to the map, often feet, meters, or degrees of longitude/latitude.
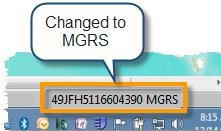
You can change the coordinate display to use any of these systems (except GARS and GEOREF) by right-clicking Layers in the table of contents and selecting Properties. On the General tab, under Units, you can select the type of coordinates you would like to see, for example MGRS.
Go To XY Coordinates

If you have a set of coordinates and you want to find their location on the map, you can use the Go To XY tool.
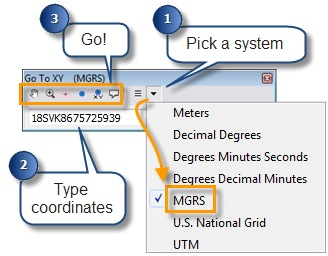
Open the tool from the toolbar, then select a coordinate format. Type (or paste) the coordinates into the text box and click one of the buttons to Pan to, Zoom to, Flash, Add a Point, Add a Point Labeled with Coordinates, or Add a Callout.
The Go To XY tool also keeps a record of recent locations, which you can return to by clicking the Recent button and selecting the location. You can use this to manually convert coordinates from one format to another. To do so, select your input coordinate notation, input your coordinates and pan to the location. Then select your new output format and select the coordinates from the Recent button.
Find MGRS coordinates
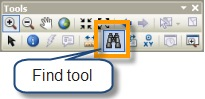
If you work with MGRS coordinates, the Find tool has an MGRS Locator that works like the Go To XY tool, but provides additional capabilities tailored to the MGRS system.
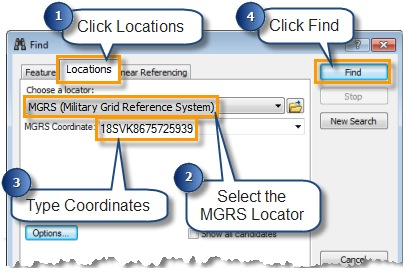
To use these, open the Find tool on the Tools toolbar. In the Find tool dialog box, click the Locations tab, select MGRS from the locator drop-down list. Then type (or paste) the coordinate into the MGRS box and click Find.
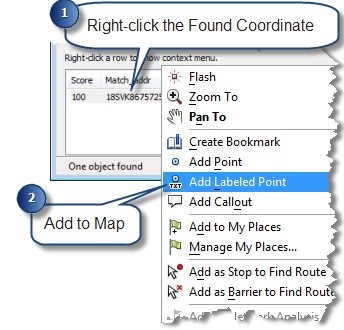
The tool will return a list of location matches (in our case there should only be one). If you right-click on the coordinate you have various options for marking the location.
So what’s different about the MGRS Locator?
The locator has options for matching shortened MGRS coordinates when you work in the same Grid Zone Designator (GZD). It has options to pull the GZD and 100,000 meter square identifier from the current map center, a default value, or use the last one used. This is convenient if you work in the same GZD over and over again, you can type “8675725939” or “VK8675725939” rather than “18SVK8675725939”, which will save you a few extra key strokes when entering your coordinates.
Converting Tables of Coordinates
There may be times when you have a lot of coordinates that you need to convert to another system. If you have the coordinates in a table, you can convert all of them by running the Convert Coordinate Notation (CCN) geoprocessing tool.
For example, you might convert a table of longitude and latitude values in decimal degrees (DD) to MGRS.
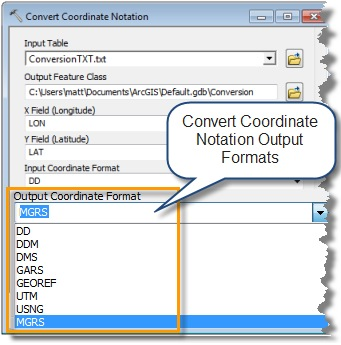
With the CCN tool you can convert between DD, DDM, DMS, UTM, USNG, MGRS, GARS, and GEOREF.
The tool takes your table of coordinates and converts them to point features with an attribute containing the new output notation.
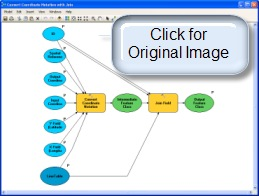
It is important to note that the CCN tool is a geoprocessing tool and represents a single-focus process of converting a table of coordinates; its only function is to do the conversion. The output point features do not have the same fields as the input table.
If you want the output points to have all of the attributes of the input table (in addition to the new notation field) you must put the tool in a Model Builder model that uses the Join Field tool to attach the original fields.
The model would look something like this:
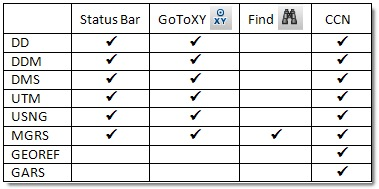
This table lists the coordinate notations mentioned above, and shows the different tools and functions that support them.
Content provided by Matt Funk
12.3. Device Security
Data sent to ELMO should be set up securely using HTTPS (Administrators take note!). In addition, each physical device should also be secured. Here are some security methods you might consider:
- Use a Screen Lock
- Encrypt Device with SD Card Encryption
- Turn off Developer Options
- Protect Device from Harmful Applications
- Delete forms automatically after being sent in ODK Collect
These suggestions are covered in more detail below. They are just here for your consideration; you should refer to the Android Quick Start Guide for more information. If your device is on Android version 5.x, click here; if it is on 6.x, click here.
12.3.1. Use a Screen Lock
Think of a screen lock as a password to unlock a phone. Using a screen lock is important for security. If someone is in physical possession of a device, to access the device’s information, they will need to know how to unlock the device.
Android has several options for screen locks. These include drawing a pattern, a numerical keyphrase, and a text passphrase. On newer devices, fingerprint scanning is also possible as a screen lock.
A screen lock should allow the user of the device easy access to the device and their data, but should be difficult for someone else to guess or access.
Opening the Screen Lock Menu
To change screen lock settings, go to the main settings menu and look for a Lock Screen, Screen Lock, or Security or something similar.
Android 6.0 and up
Settings > Security > Screen Lock
Open the device’s Settings application. Look for Security and select it. Then select Screen Lock.
Android 5.0
Settings > Lock screen
From the Home screen, pull down the main menu by swiping down. The gear menu in the right corner opens Settings. Inside Settings, find and select Lock Screen.
Changing The Screen Lock
Once inside the screen lock menu, select the screen lock you wish to use. You will be guided through how to change the screen lock. The screen lock options available depend on each device, its operating system (OS), and the version of the OS on the device.
12.3.2. Encrypt Device with SD Card Encryption
If a device is lost, stolen, or in someone else’s possession, they may be able to gain access to the data on the device by physically accessing the data card. Encryption stores data in a scrambled state. Encryption ensures that only those with credentials can unscramble or unencrypt the data and read it.
According to Android documentation: “Encryption stores… data in a form that can only be read if you have the right credentials. This can provide additional protection in case [a] device is stolen.” (1) Types of data that can be encrypted include “account data, app data, music and other media, and downloaded information.” (source)
To Access Encryption Settings
In the main settings menu, look for Security or similar. Inside the security screen, look for Encryption, Encrypt phone, Encrypt tablet, or similar.
Android (5.0, 4.4 and lower)
Settings > Security > Encrypt [device]
Encrypting Your Device
Inside the Encryption menu, follow the instructions on the screen to encrypt the device. You will need to have access to a charger and set aside an hour or more for the encryption process.
Use Encryption with a screen lock
It is recommended to use a screen lock if encryption is used on a device. Without a screen lock, encryption’s security protection is reduced.
Some devices require a screen lock if encryption is enabled. Some devices only allow certain types of screen locks to be used, such as a pin or password, when encryption is enabled.
12.3.3. Turn off Developer Options
Developer options are settings within the Android system that allow a device to be used to develop and debug an application. If you are not actively testing an application, you do not need to keep developer options on.
Determine If You Have Ever Activated Developer Options
By default, developer options are completely hidden in Settings. Look in the main settings menu. Is there an option listed for Developer Options or something similar?
If not, developer options have not been activated on the device. You can skip the remaining steps in this section.
If Developer Options or something similar is listed, you should follow the next steps to secure the device.
Open Developer Options
Settings > Developer Options
Turn Off Developer Options
Once Developer Options is open, turn off Developer Options.
Inside Developer Options, if you see that Developer Options are already turned off on this device, this device is protected. You can skip the remaining steps in this section.
Turning off Developer Options may involve moving a toggle from the “on” to “off” position. Or it may involve deselecting all options so that no checkboxes remain checked.
Android 5.0
On the top bar inside Developer Options, switch the toggle from On to Off. You will know Developer Options are turned off when the options on the screen are grayed out.
12.3.4. Protection from Harmful Applications
Each time an application is installed, it has the potential to access data and media, information about other apps, geolocation, and a great deal of information about each device. It is important to install only trusted applications and to remove any applications that are not trusted.
After the initial install of necessary programs on the device, such as ELMO software, device preparers can add security measures to protect against harmful applications.
Use the Approved Application Store
It is recommended to install applications through the operating system’s approved application store. For Android devices, this means most applications should be installed through Google Play Store. The applications found in the operating system’s approved application store have been vetted to ensure the application does not contain malware. Despite this, it is possible for an application from the approved application store to be rouge in some way, including asking for permissions to information on your device that it does not need. It is good practice for election observers and device preparers to only install programs that are needed and trusted.
Turn Off Unknown Sources
To ensure only applications from the approved application store can be used, device prepares can turn off the Unknown Sources setting.
Inside the device’s settings, look for a setting related to types of applications that can be installed. On some devices, this may mean making sure the box marked next to Unknown Sources is not checked or to uncheck it, if needed. On other devices, there may be a different way to turn off Unknown Sources.
Android 5.0
Settings > Security > Phone Administration > Unknown Sources
Turn on App Verification
App verification ensures that an application undergoes a security check on install and periodically. Look for a setting inside the main settings security menu related to “app verification,” “verify apps,” or something similar. Ensure that application verification is enabled.
Android 5.0
Settings > Security > Phone Administration > Verify Apps
Make sure the box next to Verify apps is checked.
Android 6.0
- Access Google Settings. You can use one of these methods:
- Open the Settings Touch Google.
- Open the Google Settings
- Inside Google Settings, touch Security.
- Under Verify Apps, ensure that Verify Apps is turned on and turn on Scan device for security threats.
Uninstall questionable applications
If questionable apps have been installed on a device or there are applications that are no longer needed on the device, it is recommended that these applications be uninstalled for added security.
12.3.5. ODK Collect: Delete after sending forms
In case you are worried about sensitive information you’ve collected and “what if I lose my device,” you may want to also consider removing any filled out forms on the ODK Collect app after they have been submitted and received by ELMO.
The “Delete After Send” option is available through ODK Collect settings. For more information, please visit https://opendatakit.org/.